E23 | Westford Historic Renovation | Gutted and Rewired
Season 46 Episode 23 | 23m 42sVideo has Closed Captions
Heath visits Keith Cambell to check in on the rewiring of an antique chandelier.
Kevin O'Connor meets Charlie Silva upstairs, who explains his phased approach to insulation: attic first, then the rest of the house. They review the bathroom plans. Kevin checks on solar prep with Dan McCarthy and gutter work with Tom Silva. Meanwhile, Heath Eastman travels to NH to help rewire an antique chandelier. Back at the house, Kevin and Charlie finish the portico railings.
Problems with Closed Captions? Closed Captioning Feedback
Problems with Closed Captions? Closed Captioning Feedback
Funding for THIS OLD HOUSE is provided by The Home Depot and Renewal By Andersen.
Support provided by:

E23 | Westford Historic Renovation | Gutted and Rewired
Season 46 Episode 23 | 23m 42sVideo has Closed Captions
Kevin O'Connor meets Charlie Silva upstairs, who explains his phased approach to insulation: attic first, then the rest of the house. They review the bathroom plans. Kevin checks on solar prep with Dan McCarthy and gutter work with Tom Silva. Meanwhile, Heath Eastman travels to NH to help rewire an antique chandelier. Back at the house, Kevin and Charlie finish the portico railings.
Problems with Closed Captions? Closed Captioning Feedback
How to Watch This Old House
This Old House is available to stream on pbs.org and the free PBS App, available on iPhone, Apple TV, Android TV, Android smartphones, Amazon Fire TV, Amazon Fire Tablet, Roku, Samsung Smart TV, and Vizio.
Keep Exploring

This Old House Insider Newsletter
Get This Old House exclusive stories, tips, and behind-the-scenes information delivered right to your inbox every month.Providing Support for PBS.org
Learn Moreabout PBS online sponsorshipKevin: Today on "This Old House"... Our homeowners want to add solar power to their 1890s colonial, but roof panels are not an option.
So start the drilling.
Tom: And today, we're gonna be installing new gutters that look like wood without the maintenance.
♪♪ Man: Ahh, that's it.
♪♪ ♪♪ ♪♪ Kevin: Hey, there.
I'm Kevin O'Connor, and welcome back to "This Old House" and to our project here in Westford, Massachusetts, where we are working on this 1890s colonial.
You may recall that the house suffered a three-alarm fire years ago, and it had to be taken back to the studs because of the extent of the fire and the water damage.
Lots of progress on the outside, which means that the crew can now turn its attention to the inside.
And you can see, well, Heath's obviously been here because we've got the rough electric that has been put in.
That has already been signed off on by the inspector.
And even though he's been here, we haven't been up on the second floor in a while, so let me give you a lay of the land.
This front corner room, they're calling it a guest room, but while Mom and Dad are waiting for the carriage house to be complete, they're actually going to spend some time in this room in the back corner of the house.
We've got this room with the beautiful bay window.
Our homeowners are going to use it as a media room.
And then, tucked back in here, a very large primary suite.
It's also got a beautiful bay window.
And if you could walk through this wall right here, this little nook set up for a washer and dryer in the back hallway.
And my favorite feature of the house, the back staircase.
That top part had to be rebuilt by Tommy and Charlie because that's where we had the fire damage.
Charlie, how are you?
You guys are cranking.
Charlie: Not bad, huh?
Kevin: No, not bad at all.
Charlie: Well, like all of our jobs, these were in a tight timeframe.
Kevin: Yeah.
Charlie: We're doing it in two phases.
So, phase one is the second floor and attic.
Phase two is the first floor and basement.
And we're all inspected and started insulating already in phase one up in the attic.
Kevin: So insulation coming down to the second floor next?
Charlie: It'll be here very soon.
And board and plaster next week.
Kevin: Like I said, I love it.
All right.
So, bathroom here, the only one on the second floor.
Not attached to the primary suite, either, which is a little unusual, but old house, I guess.
Charlie: It is.
So let me give you the layout.
We have our vanity over here, here's our toilet, and here's our tub.
Kevin: Tub/shower on this wall?
Charlie: Tub only.
Kevin: No shower back here, either.
Charlie: No shower.
Kevin: Well, okay.
That's interesting.
So, one bathroom on the second floor, no shower.
We do have a shower on the first floor bathroom.
Charlie: Right below us.
Kevin: All right.
Their house.
Charlie: It's their house.
Kevin: [ Laughs ] Okay.
I will catch up with you later.
Right now, I've got a date in the backyard because we get to talk solar.
Charlie: All right, we'll see you.
Kevin: Thank you, Charlie.
Our homeowners really wanted to add solar to this project.
Making electricity for the main house as well as the carriage house.
But if you look up at the roofs, well, it's not the greatest story.
On the main house, we've got a hip roof, we've got a dormer, and we've got a widow's walk.
Not great for solar panels.
And on the carriage house, well, those shingles are slate, one of only two materials that our installer does not work with.
But not to be deterred, our homeowners are no longer looking up, they are looking down for a ground-mounted system.
Dan, how are you?
Dan: Good.
Nice to meet you, Kevin.
Kevin: Same here.
So you're gonna put the system in for us.
Dan: We sure are.
Kevin: We don't see a lot of them going down on the ground, at least not in residential.
Is that typical, atypical for you guys?
Dan: Generally speaking, in more densely populated areas like Westford, it's a little more atypical because the value of land is so high.
As you move west in Mass and further north in our territory and land becomes more affordable, you see more of them because the cost-effectiveness is there.
Kevin: What did you decide on for a system?
How big?
What are we putting in?
Dan: We're putting in a 13.8 kilowatt AC system.
So it's going to be 36 modules, 18 over 18.
It's going to be about 65 feet long and about 14 feet wide.
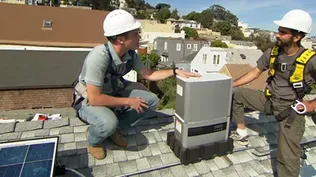
Kevin: Talk to me about the process, and what have you guys already done, in terms of prepping this field?
Dan: So, yesterday, I personally came out and marked out the four corners of the ground mount.
And what that does is, it allows our ground-screw team to come in and find all those posts in between those four corners, because they just run a tape and put them every about eight feet?
Kevin: Yeah.
Dan: After that we, ran some ground-penetrating radar, which allowed us to kind of see underground to make sure that we're not going to hit any unknown old tanks or leach fields or stuff that's just not marked on our plot plans.
Kevin: Okay.
So, you guys are actually putting in I was told, these things for us.
Screws, huh?
Dan: Yeah.
Kevin: That's what you're using?
Dan: Yeah.
This has become the industry standard.
Kevin: So I'm looking at -- what, is that galvanized steel?
Tubular?
And literally just screw threads on the bottom, huh?
Dan: Yeah.
Kevin: This will go through anything you find?
Dan: Yeah.
If we were to hit a ledge or a big rock, we would just drill right through it and screw this right into the ground.
Kevin: And you guys are ready to start drilling?
Dan: We are.
Kevin: Can we watch?
Dan: We can.
Kevin: All right.
[ Jackhammering ] Dan: What's happening here, they're blasting out the rock with a drill, and then they're shooting air down, and it's getting all the debris out of the hole so that they can continue to go deeper and deeper until we get to that appropriate screw length.
Kevin: And why is your guy dressed in basically a hazmat suit?
Dan: Because, as you can see, when that air shoots down to clear out that debris, it all comes out in a big cloud.
So you don't want to be breathing that in.
You don't want it to be hitting you in the face or anywhere on the body.
Kevin: So, the hole that you've got for us right here, it's a pretty big opening.
Dan: It is.
Kevin: Bigger than what you have for your galvanized screw, right?
Dan: Yeah.
So they'll fill that in with gravel, as well, before they drill the actual screw down, and that bites everything together.
Also, that screw is going to hit that ledge eventually.
Kevin: Oh, so you're gonna put gravel in first?
Dan: Yes.
Kevin: Then screw into your added gravel.
Dan: Yep.
Kevin: The material that came up is not too bad here, but as you said, you've probably got ledge down a little further.
Dan: Yeah.
Kevin: I know that there's gonna be some lag time before you guys start building the structure, but once these screws are in the ground, could you start adding the racking system right away?
Dan: Technically, yes.
Kevin: So no concrete to set up.
You could just kind of get right at it.
Dan: We could.
So, what I have here for you, Kevin, is a small, not-to-scale mock-up of what we're looking at once the whole system is built.
In a couple weeks, after we have the screws in the ground, we're going to come back and put vertical posts up, run our purlins across that, and we take our modules and attach them right to this strut.
This little guy comes under here, bites the strut, holds the module on, and then another module will slide right into here.
Kevin: Wow.
So it's actually not a ton of construction once those screws are in.
Dan: No, we'll have that done in two days probably.
Kevin: That is awesome.
All right.
Well, I appreciate it Dan.
And let's watch them get the rest of these screws in.
Dan: Let's do it.
Jenn: Hey, Tommy.
Tom: Hey, Kevin.
How are you?
Kevin: I'm doing all right.
Look at the size of that gutter.
How long is that thing?
Tom: It's 40 feet.
But they make the wooden gutters about the same, also.
Kevin: You love your wooden gutters.
Tom: I do like a wooden traditional gutter but requires a lot of maintenance.
Kevin: Right.
So we're going to skip wood.
We're gonna go with fiberglass.
Tom: Maintenance-free, except you got to keep them clean.
Kevin: Yeah, which is great.
And what's kind of cool is, the outside dimensions, right?
So the width here, the width here, the height here, the height here, those are basically the same.
Tom: Pretty much the same.
Kevin: But when you look inside here... Tom: Yeah, I mean, look at the difference of the volume of water that it'll carry because of the meat that's needed to give the strength to the wooden gutter.
And this is a lot thicker than this.
Kevin: Yeah.
Tom: And the other thing is, is when you connect your downspouts to the gutter with goosenecks like this, it's a process.
You have to basically drill a hole and drop this in.
But you can't have this lead sticking up higher.
Kevin: Things are gonna grab it.
Tom: That's right.
Because you have to put tar around here first, then you put it in, and then you put tar over it.
The idea of it is, is all of these lead fasteners have to be pushed down below the surface slightly, so you have to chisel out the wood so that pushes down.
Then you seal it with lead, you drop it in the wet tar, then you nail it in place, then you coat the tar over that, and feather it into the wood.
With your fiberglass one, you just drill a hole and you glue it to the gutter.
Kevin: This is gonna be our gooseneck.
You just go right through there.
Tom: Right.
Kevin: Okay.
You got a measurement for the cut?
Tom: I do.
So, we're gonna cut this one.
We got a miter this end and then miter that end.
Kevin: All right.
♪♪ ♪♪ Tom: Now we're gonna measure for the center of our downspout.
And I got 51.
Now we're going to come back out from the back, 2 1/2.
Right there, sonny.
Drill that hole.
Okay.
Nice job.
Now we're ready to glue the outlet in to go to the downspout.
We have to prep the gutter.
First thing we need to do is clean it, so we're going to sand it.
I also want to sand the outlet.
Now we want to clean both the gutter and the outlet with acetone.
And clean around the inside perimeter, also.
Want to make sure the epoxy sticks really well.
Looks good.
All right.
Now we want to slide the outlet into the hole, but we want to keep it down, slightly down.
Don't let it come all the way up.
I'm going to use some fast-setting glue.
Tack it in place.
All right.
Now we'll just speed it up with some activator.
Now, if you want to just clean that off with a rag... All right, now that we've got it clean, we can use the two-part epoxy to seal everything up nice and tight.
And this all comes in a kit.
You get the sandpaper, epoxy, some extra tips, and even a stick to basically flatten it out.
All right.
And nice thing about this tip right here, inside, it will mix the two parts together, when it comes out, and go right around.
Okay.
Now you can take your popsicle stick and spread it out and make it nice and flat, relatively smooth, because you don't want the debris getting caught up on the roughness of it.
Kevin: I just know you're dying to get in here, Tommy.
Tom: I mean, you did a pretty good job.
Kevin: Uh-huh.
Tom: I didn't say great.
I said pretty good.
Kevin: Uh-huh.
Okay.
Tom: All right.
Ready to go up, get it installed.
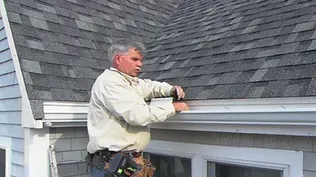
All right, now we're ready to screw the gutter off.
Now, what we're gonna do is, we don't want the water to puddle in the corner, so I want to have that corner slightly high.
I mean, not much.
So you're going to put that end of the gutter on the line.
Okay.
So now what I want you to do is put one screw in there.
And we don't have to worry about hitting the rafter tail.
Just screw it in because we have solid blocking.
[ Drill whirring ] All right.
So, that's good.
So now this is gonna be our low point of our gutter.
So, if you notice down here, I'm gonna pull this joint down slightly, just about a quarter of an inch.
I want you to put a screw right over the downspout opening.
[ Drill whirring ] Okay.
So now you notice I have this gutter down about a quarter of an inch.
I'm going to pull it up where it goes.
That's going to create a little bit of a dip, and it's going to swirl right back up to the corner.
So any puddling will go down the downspout.
All right.
Good.
All right.
So now we have our gutter position.
Now we're gonna screw it off 16 on center.
We have solid blocking.
You don't have to worry about it.
You can just eyeball it or you can use your tape measure to locate it.
[ Drill whirring ] Now, we've already cleaned the joints that we're gonna do with the epoxy.
I just want to get this dust out of here.
But I also want to do a bead of caulking right across the top edge.
I want to get rid of that chalk line.
So we'll take some acetone.
Clean that off.
So now that's all cleaned off.
Run a nice clean bead of caulking right across the top.
Okay.
Now, I'm gonna take the rag with some acetone on it.
I'll take my finger... ...get it wet with acetone, and spread this out.
See how nice and neat that is?
Now we're gonna seal this joint up, but we want to keep it from moving while we set the two-part epoxy in there.
So I'm gonna use some fast-acting glue.
All right.
So now I'll just put the activator in there.
Now we can use our two-part epoxy.
Now we'll take the fiberglass mesh here, put it right in there.
This is a way of protecting or strengthening that joint so it won't open up.
All right.
That looks pretty good.
Now, we've shown how to do a miter, and the gutter guys are gonna do all the corners like that and any other miters that have to be done.
Once they complete that, they're gonna cover the gutters with this screen system -- that's going to keep all the debris out -- and they'll put screws across the front.
This is a bed molding right here.
You can see it's got the OG on it right there with a little detail.
That will go right in there.
And just close that gap and finish it off.
Kevin: So, no-maintenance fiberglass, but you get the look of wood.
Tom: It doesn't get any better than that, does it?
Kevin: Nice.
Nice job.
♪♪ ♪♪ Heath: Our homeowners for the project in Westford have selected an antique chandelier to go in the main entrance of the historic home.
But because we believe the chandelier is roughly 100 years old, we want to be sure to have it rewired and restored to bring it to today's safety standards.
So we're here at a shop in New Hampshire that specializes in bringing old fixtures back to light.
Hi, Keith?
Keith: Hi, Heath.
Heath: It's really great to meet you and check out the shop.
So, can you tell me a little bit about this fixture?
Keith: Yes, this is an Imperial-style chandelier.
It's brass and is dressed with Czechoslovakian crystal, and it's roughly around 100 years old.
Heath: How do you know that?
Keith: Well, you look closely, you'll see that the facets are all uneven from one to the other.
Heath: Oh, yeah.
Look at that.
So they're all done by hand, not by a machine.
Keith: Exactly.
Heath: And then looks like we had the teardrops that would've been hanging somewhere down here?
Keith: Yes.
Heath: And we have some older-looking ones and some newer-looking ones.
What do you think happened there?
Keith: You got a good eye.
[ Both laugh ] The older ones and the newer ones were mixed together.
And the reason for that is, they were hit, they were cleaned, and they fel,l and... Heath: Don't want to replace them all.
You want to keep some of the old ones if you can.
Keith: Exactly.
Heath: All right.
Well, the part I really want to see is, I want to see how you rewire this thing.
Keith: Oh, well, then I'm gonna turn you over to my son.
He's very good at this stuff.
Heath: Sounds good.
Keith: Okay.
♪♪ Keith Jr.: As you can see, I already got a head start taking off these crystals.
Heath: Okay.
Keith Jr.: And if you'd like, you can give me a hand.
We can get them off of here, and we can get this bottom cage off so we can start working on the rest of it.
Heath: Perfect.
I'll start working on this side.
Luckily, it looks like the crystals themselves are in pretty good shape.
It's just some of the wire, huh?
Keith Jr.: They're actually in very good shape for the age.
Heath: Next step is, said taking the bottom off?
Keith Jr.: Yep.
We're gonna just take this cage off so it gives us a little better access.
Heath: Okay.
Keith Jr.: Perfect.
Heath: Look at that.
Keith Jr.: Okay.
We're gonna take the bulbs out next.
Heath: Okay.
Keith Jr.: All right.
Now we're gonna remove the set screw here in the screw collar, and that'll allow us to slide up this cover on the wiring hub.
Heath: See if it's any better.
Hey, there it is.
Keith Jr.: There we go.
Excellent.
We will get a zip tie here, and it'll just hold it up temporarily... Heath: Perfect.
Keith Jr.: ...while we work on the wiring.
Heath: Keep that right out of the way.
Keith Jr.: Next, in order to get these wires pulled through, so we're gonna take off this bottom cover, as well.
So we're just gonna go ahead and cut all this wire since we're gonna be replacing it all, and that'll allow us to pull it out of each individual arm.
Heath: All right.
So now what?
We can take the sockets out?
Keith Jr.: Yep.
Yeah.
We can unscrew these sockets and hopefully pull these wires through.
There it is.
Heath: All right.
So it looks like we have all the sockets are out, all the wiring's out except for the main piece coming down the stem.
But it looks like they actually split it and stuck individual conductors out the two holes.
Keith Jr.: Exactly.
Normally, what we would have is the hickey, which is here, and they would come straight down and both come out the same side.
Heath: Come out of the side.
So, pulling it out's probably pretty easy, but trying to put this back in, a little tougher?
Keith Jr.: Exactly.
Heath: Okay.
♪♪ ♪♪ Heath: So it looks like you made some pretty good progress.
Got most of these sockets wired up, and it looks like it's pretty close to ready to go.
Keith Jr.: Yep, yep.
We're just gonna need to pull these wires up through the top of the hub here and screw on the bottom cover of the hub.
All right.
So we're gonna connect all of these white wires together, and then I'm gonna grab the ribbed black wire which is our feed wire.
Twist that on, as well.
And put our wire nut over there.
Time for the hot wires.
These seem like they're nice and tight.
Heath: Good.
Keith Jr.: All right.
We're just gonna slide our screw collar back down and tighten up the set screw.
Heath: Perfect.
So I know you guys are a UL-certified shop.
Can you explain what that means and how that works?
Keith Jr.: Yeah.
So, we use all UL-certified components on the fixture, and we perform several tests to make sure that the fixture is safe.
Heath: Perfect.
So what's the first test?
Keith Jr.: So, our first test is going to be a hipot test, which will tell us if we have any shorts in the fixture.
So we take our ground, we hook that up, and we come over here.
Gonna bring it up to 1,300, and it stays for over a second.
So we are all set.
Heath: All right.
The next step is?
Keith Jr.: So, the next step would be to test to see if we have a short between the terminals on the socket.
Heath: In the socket itself.
Keith Jr.: Exactly.
Heath: Gotcha.
1,300.
Keith Jr.: 1,300 volts.
We're holding steady.
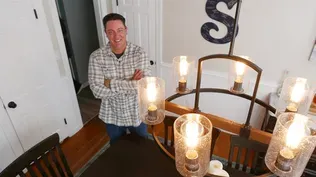
Heath: So the final step is to throw a bulb in and see if it works?
Keith Jr.: Exactly.
And we light it up to just make sure everything is working right.
Heath: Look at that.
Oh, Keith, it looks great.
I mean, all the testing's done, so I'm looking forward to seeing this in a couple weeks, and then we'll get it installed.
Keith Jr.: Sounds great.
Heath: All right.
We'll see you then.
Thank you so much.
Keith Jr.: Thank you.
Yeah.
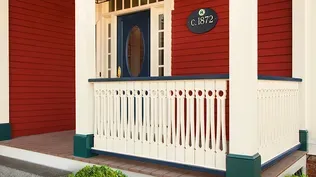
♪♪ Kevin: Charlie, those gutters?
Perfect look for this house.
Charlie: Just like the original wood gutters, right?
Kevin: Yeah.
Charlie: And we're duplicating these rails, also.
And if you remember, in the old photo, they look just like this, but they were made out of wood.
Kevin: So you take the photo and do what with it?
Charlie: We actually scaled it as best we could to the photo to what we thought we had.
Kevin: Okay.
Charlie: So we sent them to the factory, and they were able to duplicate it.
This is made out of solid cellular PVC in a CNC machine.
They cut it right out.
And then the top and bottom rail also PVC.
Kevin: So this isn't the finished look, though.
How do we end up with a finished top rail?
Charlie: Right here would be what you have in your hand.
And then this would snap over it to completing the whole system, what it would look like.
Kevin: That's pretty cool.
Well, I still have my belt on.
What can I do?
Charlie: Excellent.
So, I'm gonna mount this side first.
Kevin: Stainless-steel screws.
Charlie: And then, the longer ones will line up to go right in through this section here.
Kevin: Yeah.
Charlie: And the shorter screws can be in the middle.
[ Drill whirring ] And just a couple more short ones right here and we're good.
[ Drill whirring ] Kevin: Good.
Charlie: I'm gonna rotate this right around.
Kevin: Oh, yeah.
Smart.
[ Drill whirring ] Charlie: What do you think?
Kevin: Yeah, I think I like.
So, show me this fancy system here about how we fasten these things with the aluminum tracks.
Charlie: So, we just take this top of this system here, you're going to put it to that line, and then we'll use the clamps to hold it.
Same thing on this side.
All right.
Time for the, uh... Kevin: Is this coming in?
Charlie: Yep.
Kevin: Both the same, right?
Charlie: Yes.
Kevin: No top, no bottom yet?
Charlie: Well, if it doesn't fit, I'm blaming you.
Kevin: [ Laughs ] Well, you know, that's a Silva thing to do.
I'm used to it.
Charlie: I learned.
Kevin: Oh, yeah.
You've learned from the best.
Charlie: That seems solid.
Kevin: Yep.
That's perfect.
Charlie: Looks good, doesn't it?
Kevin: Yeah.
Charlie: We're gonna take this and slide it in.
Kevin: Okay.
Charlie: All right.
Now, to cap it off... One side on.
Kevin: Give it a little tap.
Charlie: Let's tap it down.
Kevin: Oh!
[ Laughs ] I got another one over here.
Charlie: Throw that one on.
Kevin: Okay.
Charlie: All right.
One more finishing touch.
PVC cap.
Kevin: So, we got PVC and then mahogany on top.
That is awesome.
Well, outside is looking terrific, Charlie.
Congrats on getting it this far.
The details are exquisite.
And this is a great way to finish off this roof.
Charlie: Looks good.
Kevin: Yeah, it does.
All right, well, until next time, I'm Kevin O'Connor.
Charlie: And I'm Charlie Silva.
Kevin: For "This Old House" here in Westford, Mass.
♪♪ Kevin: Next time on "This Old House"... Mauro: Painting is a family affair here in Westford.
Brushes and rollers for everyone.
Tom: We're building a custom window seat to match the one that was burnt in the fire.
[ Mid-tempo music plays ] Kevin: A few years ago, we brought you a story about a post-secondary trade school.
Well, today, I'm going back to celebrate some new graduates at this year's commencement.
That's next time.


Support for PBS provided by:
Funding for THIS OLD HOUSE is provided by The Home Depot and Renewal By Andersen.